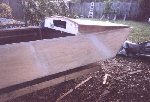
The completed foredeck installation with hatch and forward side decks in place. |

|
The side panels are installed. All joints and seams are faired in and everything has been
covered in a layer of cloth and resin. |

|
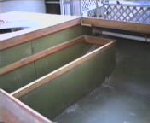
Another view of the side deck and puttied joints. The holes for the access hatches in the
flotation compartments will be cut in later. |

|
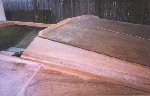
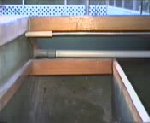
A forward view of the side deck and puttied joints. All the edges were radiused with a belt
sander to remove the "hard" edges so the cloth will lay down smoothly. |
|
I mounted a strip of wood across the top edge of the foredeck to act as a spray
deflector. It can also be used as a mount for a Plexiglas wind deflector or a mini windshield if I find that one is required in the future. |
|
Another view showing how the deflector will prevent water from running over the top edge and down
onto the instrument cluster. |
|
This is the steering torque tube and guide tube exiting the port aft floatation compartment.
Note that the finish sanding has begun. |

|
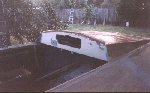
A wider view of the port aft floatation box with the hatch cutout completed. |

|
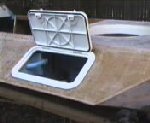
The port floatation compartment hatch is test fit after the cutout was complete. |

|
Look! The lid opens, the edges are so much smoother and I can almost climb through them! |
|
Here is the rear seat/storage compartment waiting for final glassing. The frame is epoxy glued
and screwed to the H1 panel. |
|
This view is looking towards the port side deck across the rear seat. Just below the cockpit
rail is the steering torque tube and guide tube. The guide tube is a continuous tube through the floatation compartment to maintain its watertight integrity. The lower tube is the electrical
conduit that comes from under the dash panel. |
|
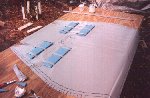
I started laying out the skirt on the living room floor. Here I have one of the panels drawn and
ready to cut. You can also see the template that I made to keep all the corner seams consistent. Uh oh! There's my supervisor in the background. She seems to be dogging me every step
of the way. |

|
Here are the two rear quarter skirts. The template is really making things go rather quickly. There
are about 10 places the template is getting used. This is typical for all the panels so I won't bore you with any more low res pics. I'll post some scans up later. |

|
Here is a detail of the modified skirt flap looking at the inside the skirt. I inserted the flap into a
slit and glued it to the inside. This will eliminate the possiblility of the flap being torn off by water pushing against the leading edge of the patch and peeling it off if it was glued on the outside
of the skirt. Go to the enlargement and you should be able to see the slit. |
|
Another detail of of the drain flap looking at the outside the skirt just after being glueing on the flap.
I also added a reinforcing patch over the flap and the slit on the inside. This patch should help keep the flap glued to the skirt and prevent the slit from ever being torn open. The flap itself
was made from two layers of material to provide stiffness and ensure it never "falls" inside the drain. |
|
This is the inside of the rear skirt. You can see the floatation foam, the drain and the tabs for gluing to the rear quarter
skirts. This is typical for all the main skirt pieces. |
|
Here is the beginning of the main skirt attachment. I started in the center rear and worked forward along each side. Notice
the rear drain flap. |

|
After the main skirt was attached to the sides, then came the bow skirt pieces. |

|
And then the hull was flipped over to attach the other edge of the skirt. |

|
