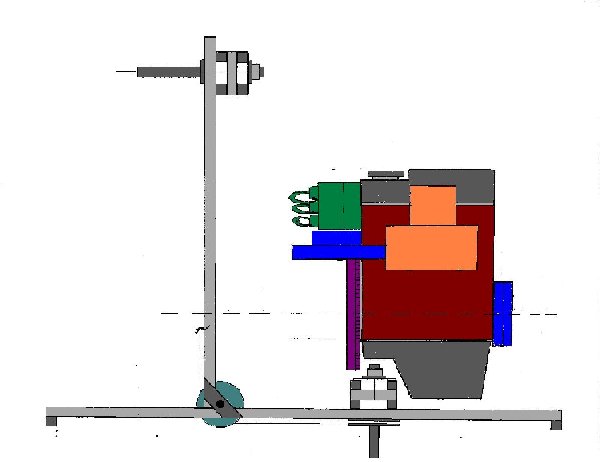
Click on the image at the left for a larger view. Use your "BACK" button to return. The diagram is drawn pretty close to scale.
Lt Gray = Engine Stand
Dark Gray = Valve Cover & Oil Pan
Red = Engine Block
Orange = Carb and Intake
Green = Distribuor
Blue (left) = Water Pipe to Radiator
Blue (right) = Front Pulley for Alternator Belt
Teal = Idler Pulley
Purple = Flywheel
|
Date |
What did I do today? |
Cost |
Hours |
| |
Check out the pictures of my GEO installation and other modifications.
---> CLICK HERE <--- |
|
|
07-04-00 |
I went to a local U-Pull-It auto salvage yard and pulled a 1992 GEO Metro engine and radiator. It was a tough job to do
alone. I would recommend having a least a little help along. |
266.70 |
3.75 |
| |
have been researching the GEO application and it looks pretty good except for the carburetor and
distributor that came on the engine. Both will have to be replaced since the engine is virtually 100% controlled by a little black box. If I were to keep the engine completely stock
it would mean all the (20 or so) sensors and other controls, vacuum hoses, wiring and the little black box would need to stay in perfect condition. What are the chances of that in a high
vibration and damp environment? Exactly, so I have decided to replace the distributor with an earlier model that has a self contained electronic ignition system and adapt an early model
carb from a VW beetle. These engine modifications are not really all that difficult and the hardest part will be fabricating and welding together a carburetor adapter. |
|
|
| |
I have been looking over the existing engine/prop stand and after some extensive measuring and making
scale drawings, it appears as though the GEO will be easily adapted to the main tubes of the stand. I will have to make two or three crossmembers for the existing stand, some brackets
to attach to the engine, two side rails for along the engine, an aft bridging crossmember for the drive shaft pillow block and fit everything so it sets on six adjustable height vibration
reducing mounts. These mounts will lift or lower the entire engine, drive shaft and frame assembly to tension the fan belt. The prop drive is being designed to use a self tensioning
chain drive system. The radiator will be mounted on the vertical prop support tubes. This should provide enough air flow to easily keep the engine cool! |
|
|
07-25-00 |
I went to the hardware store and picked up some 1.25" angle iron for the engine brackets. I cut four of
them to a rough length and drilled holes in two of them. I had to quit when the skeeters got real bad! (I think they are Florida's true state bird but the Gov won't admit it!) |
$8.50 |
1.25 |
07-27-00 |
I measured for the length of tubing needed for the engine side rails and crossmembers for the stand. I went
to the local hardware store and purchased the tubing and some metric bolts to attach the brackets to the engine. No work tonight since the skeeters are really bad out there!!! |
$22.25 |
|
07-29-00 |
I went back to the auto salvage yard and exchanged the radiator for a better one (no charge), I suspect the one I
had originally had a small hole in it. I also pulled a distributor that has a self contained electronic ignition module unit inside of it and also uses a mechanical/vacuum advance system.
|
$19.17 |
0.75 |
07-30-00 |
I removed the carb, EGR valve, distributor and all the vacuum lines and excess emissions equipment. I
rerouted an intake water heating line, and installed the replacement mechanical/vacuum advance distributor. Then I made two templates, one to cover the EGR valve opening in the intake and
one for the lower plate of the carb adapter. |
|
1.00 |
08-03-00 |
I ordered 4 rubber mounts for the engine and the pillow block for the engine drive shaft from Hoverware Hardware. |
$84.35 |
|
08-03-00 |
I ordered a new VW beetle carb rather than trying to find a used one and having to do a rebuild on it. I
also ordered a pretty cool, fully enclosed chrome air filter. These both came from
J.C. Whitney. |
$155.08 |
|
08-03-00 |
I ordered a new steering gear system. Since my torque tube system already failed me once, and I am installing a drive
system with three times the horsepower as the original design, I wanted a tough system that would hold up under all conditions. I am using a Teleflex rack and pinion cable system designed
for outboard motors purchased through SailNet.com. |
$175.00 |
|
08-06-00 |
Picked up some more tubing and steel flat bar at the local hardware store. |
$10.24 |
|
08-10-00 |
I drilled the mounting holes in the remaining two engine legs and test fit them on the engine. I tipped the engine up
on end and started taking measurements for the rails and crossmembers. |
|
1.00 |
08-12-00 |
I cut notches in the four engine legs for the engine support bars and welded them all together. I cut the
crossmembers for the engine stand and a set of support rails that will attach to the crossmembers. I propped the engine in place on the engine stand to check the fit and everything looks
like it will come out just fine. |
|
3.75 |
08-13-00 |
I welded the crossmembers in place and then welded the support rails for the rubber mounts on top of them. I
set the engine back on top to recheck everything and it fits great! I cut and welded the rubber mount pads to the support rails, drilled the mounting holes and welded the compression
bushings through the pads and support rails. I finally got the tailpipe stub off the exhaust manifold by breaking the tailpipe bolts, then I ground them off flush. I cleaned the donut
gasket off and checked the fit of a piece of 1.75" exhaust pipe and it fits perfect over the donut pipe flange. I will get rid of the donut seal and attach a hard pipe to the exhaust
manifold. |
|
5.25 |
08-14-00 |
I stopped at the local auto store and bought a new alternator belt, engine degreaser, tailpipe adapter and an
automotive muffler. |
$29.79 |
|
08-18-00 |
I made another trip down to the auto store today. This time it was an exhaust manifold gasket, carb gasket,
tail pipe, assorted pipe adapters, a piece of flex tubing and more engine degreaser for the engine stand so it can be repainted. |
$47.06 |
|
08-18-00 |
Today I welded the compression bushings in the engine support bars and cleaned everything up. Out came the
cold galvanizing spray and the black paint. I got all the parts of the engine stand painted (or re-painted) as well as the engine support bars. I also gave the engine a good cleaning with
degreaser, it was a bit of a mess. Then I went and pulled the steering torque tube out and removed the steering wheel assembly. I also cut the guard screen away from the forward
center brace and cut the brace out so it will clear the engine when I test fit it later. |
|
4.50 |
08-20-00 |
The pillow block bearing mounting bar was cut and the adjusting bolts were welded to it. It was then welded to the
vertical prop shaft support tubes. Holes were cut in the steel plate for the lower radiator mounting tabs. |
|
2.50 |
08-21-00 |
I cut the holes in the bulkheads for the PVC pipe that will allow the steering cable to pass through the port rear flotation
compartment. I also cut the hole
in the dash panel for the steering box. |
|
0.25 |
08-26-00 |
I went down to where I work and used the facilities today. I cut two 1/2" thick aluminum plates that attach to the
engine block or the starter to bolt to (remember, there is no bell housing). I cut a small 1/4" thick plate to cover the holes in the intake manifold where the EGR valve used to
be. Then it was the difficult part, the carb adapter. I cut two 3/8" plates, one that matches the intake and one that matches the carb, then I cut a piece of thick walled tubing
to connect them together. The tubing had to have one end of it cut at a 15 degree angle since I have mounted the engine vertical instead of at the original "leaned over" position
as it is in the car. Fortunately there was someone there today that was able to weld the pieces of the adapter together for me. I was also able to get him to weld the flywheel flange
adapter plate to the main driving shaft and then face it off square in the lathe. It was a very productive and successful day. |
|
2.75 |
08-26-00 |
I went to the local hardware store again and picked up the metric nuts and bolts that I needed to finish connecting the
pieces to the engine. |
$11.67 |
|
08-27-00 |
Its a wonderful day! The radiator brackets are all welded on and the overflow tank is mounted! I thought the
little tank was going to be a problem since there was no bracket, but I found an easy way to make one! The top bracket required a little work to bend it and shape it so it didn't touch the
top tank, I don't want any problems due to vibration. I modified the water return pipe going into the water pump and routed the lower radiator hose. The top hose is still giving me a
little problem. The temporary setup of all the parts is looking really good. I should be mounting everything back on the craft sometime this coming week. |
|
4.25 |
08-27-00 |
I cut and installed the PVC pipe through the port flotation box for the steering cable and I epoxy coated the hole in the
dash for the steering box. |
|
0.75 |
09-02-00 |
I removed and started to relocate the PVC deck fittings for the engine wiring but I only got a little done due to rain.
I was a nasty day and very disappointing not to accomplish much. |
|
1.00 |
09-03-00 |
I finished putting in the PVC conduits, pulled the battery cable and pulled the old wiring harness in. Another nasty
day, wasn't sure if i'd get wet. |
|
1.50 |
09-04-00 |
Finally, I got a lot accomplished! The fan belt is on and adjusted. The main wiring harness is in and bundled up,
there are still a few connections to make but I have to get the prop guard back on first. At least the engine turned over on the first try! I cut the prop guard tubes so that it would
fit around the engine and I also precut and bent a few of the new tubes I have to install. |
|
3.75 |
09-06-00
09-07-00
09-09-00 |
Cut, bend & weld. Cut, bend & weld. Cut, bend & weld. The guard is slowly taking shape
again. There's a lot of tubes that have to get around this engine! The guard tubing is "major" welded. I still have to fill in a few places with touch-up welds.
I also welded a bracket for the coil on the guard tubing
directly over the engine. |
|
6.25 |
09-10-00 |
IT RUNS!!!
The GEO is running! Its still a little rough but
that's just a matter of a few adjustments in the timing and on the carb. I eliminated the ECM (electronic control module) completely, no finicky black box required on this engine!
Today I had to finish installing a few of the wires to the engine, mount and wire the coil, temporarily hook up the exhaust and charge the battery. All in all it went pretty well.
There seems to be a vibration around 1800-2200 rpm but I will see what happens when the rest of the drive system is hooked up. |
|
3.00 |
09-12-00 |
I cut and installed new & much longer rudder pivot bolts. The steering box and wheel were installed and the
steering cable transom bracket was mounted to the transom. I attached the steering cable mounting bracket to the rudder connecting bar and checked the steering. I have 1 3/4 turns
lock to lock with rudders swinging about 120 degrees. I wish I had used this system from the beginning. |
|
1.50 |
09-13-00 |
I attached the fan so I could move the craft into the shade to work on it in the middle of the day. The vibration I had
at about 2200 rpm is now gone. I runs very smooth. I cut and attached the wire screen to the new tubing of the guard. |
|
2.00 |
09-15-00 |
I received the remaining peices of the new drive gear from Hoverware Hardware. The new gear consists of a pillow block
bearing, 2 sprockets, chain, idler sprocket and a chain tensioner. |
$325.00 |
|
09-14-00
09-15-00 |
I brazed all the new screen to the guard and touched up any other welded joints that needed help. I filled all the old
conduit holes in the rear deck with filler and epoxy. I test fit one of the sprockets (the other one they sent was not the right one!) to be sure my shaft lengths will work.
Everything looks great so far. |
|
3.25 |
09-16-00
thru
09-20-00 |
Well its been a tough week getting anything accomplished due to the weather. I welded in the exhaust system hanger
brackets then primed and painted the prop guard and exhaust system (used high temp paint). I installed the chain sprockets, cut the chain to length and installed the tensioner with the
idler sprocket. I checked the prop pitch blocks and found out I do not have to trim the blade length so the prop was reassembled and installed. The navigation lights and wiring were
reinstalled on the prop guard and the engine wiring harness was resecured. The engine was test run and
everything seems to run pretty smoothly through the rpm range I can get while
not starting to fly (up to about 2200 with someone holding the nose of the craft). With me standing in the craft, it lifts and levels nicely at about 2000rpm, vibration is minumal and noise
is quite acceptable. I may be able to make it a little more quiet when I install the back seat rest/sound damper board. I may even try a partial hood to protect the engine from the
mild spray. |
|
6.75 |
09-21-00 |
I tie-wrapped some of the wire bundles, temporarily secured the battery and gave everything a once over getting ready for the
trip tomorrow. Everything looks good so maybe I'll take a test spin tomorrow morning before loading up. |
|
1.50 |
TOTAL COST THIS PHASE..... |
$1154.81 |
Total Cost for Engine Modification..... |
$979.81 |
TOTAL TIME THIS PHASE..... |
62.25 |